Dear Gracie,
I wish we’d had more time to chat before this phenomenal trip you’re taking to Munich. Now that you’re rediscovering photography, I know your time there will be even richer and your observations deeper as you try to capture digitally what you’ll see in real time.
It will be so fun to compare notes and discuss camera settings and the pros and cons of different lenses, composition, lighting, favorite subject matter, etc. Since we’re both Canon users, maybe we’ll even be able to take some photo walks together and use each other’s lenses!
Since our conversation the other day was cut short, I thought it might be nice, still, to address some of your questions about getting back into photography and stepping it up a notch and taking great photos in München. So, first, let’s go over a few easy ideas which any photographer can incorporate to decrease motion-blur and take sharper images in low-light conditions.
- I am excited about your Tamron 18-200mm lens:

It’s gotten lots of good reviews and as we did discuss, it sounds like a great all-around lens to take with you. A common theme in the reviews was the frustration with blurriness when you get closer to a 200mm focal length and you’ve talked about your own irritation with this, especially in low-light. A tripod, as you know, would definitely help prevent camera-shake and allow for longer shutter speeds. But, like I told you, I rarely travel with a tripod, preferring instead to use a ledge or table or chair:

Photo by Sean Lamb on Flickr licensed under Creative Commons
I just don’t want to carry around the extra weight of a tripod, preferring instead the extra weight of a book! Many people travel with a tripod (and a book, or e-reader), though, and they are better people than I.

When I find the right tripod/backpack/book/weight combination perhaps I’ll probably reconsider. (But I still can’t imagine an e-reader.) If you do decide to take a tripod, I applaud you! You are made of heartier stock than I am and I’ll look forward to hearing your experiences travelling with one.
There are a few basic things to consider when taking an indoor or nighttime or other low-light photo in order to achieve nice focus. It’s good to consider these techniques, I think, even with a tripod. None of these ideas, however, are set in stone and as we improve as photographers – and you are a mechanical engineer after all! – we personalize how we decide to deal with these sorts of photographic challenges:
- Think about using your camera’s self-timer. You can set the camera on the aforementioned ledge, etc. then set the in-camera timer for 2 or 10 seconds. This allows you time to step back and for your camera to not be subject to any movement you might cause. Here’s an example of a shot I took at the Louvre using the ledge and timer technique:

- Try to avoid in-camera flash. In low-light, flash can be valuable but will more often than not create shiny foreheads, red pupils, and unnatural-looking subjects. Manipulate the settings on your camera instead to allow enough light to reach your sensor. Plus, an in-camera flash will not light up anything further than 10 feet or so.
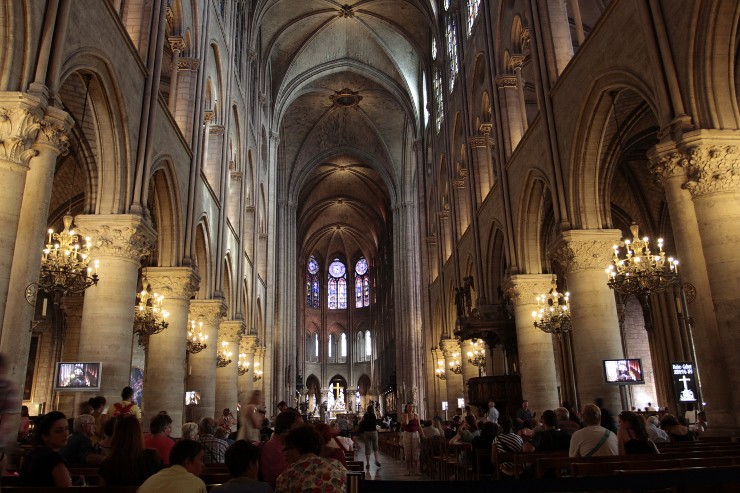
- This may mean keeping your lens at or near 18mm and the low-end focal range. This allows a nicely wide-open aperture of about f/3.5. Cool. At this wide angle you may have to move around a bit to focus on one person, say, or one object. Ease out your lens a bit if necessary, but staying on the lower side will allow all the light possible to enter and reach your camera’s sensor. Conversely, this wide of an angle can really help you capture cathedral interiors and other wide-expanse scenes. For example (in keeping with the Paris theme), I shot this at 17mm (with a crop-sensor camera like yours – we can definitely talk more about that in the future):
- You can also step up your ISO. With your Canon Rebel XTi,

you’ll probably find yourself shooting at ISO 800-1600 which increases your camera’s sensitivity to light. This can create some noise in your photos, though, so beware.
- When hand-holding your camera to take a photo in low-light, think about your posture. This can help decrease the noise when shooting at higher ISO’s.
- If possible, lean against a wall to lessen any camera-shake caused by body movement.
- Hold your elbows steadily in at your ribcage or actually touch your elbows in front of you. By doing this you are bracing your camera by creating a sort-of tripod with your body. A bodypod. (Hmmm…a new term to coin?)
- Digital Photography School, a website which has taught me so much and contains just a wealth of information about photography, has a great pictorial on stable camera holding:

- Take a deep breath, then hold it while you take the shot. The mere act of breathing can cause motion-blur. But make sure you remain comfortable. Taking a low-light shot should not cause (too much) suffering.
Happy low-light shooting with your Rebel XTi and your Tamron 18-200mm in Munich and beyond! I hope to have a chance to share some basic ideas about composition with you very soon!
Love, Renate
